Captain MAGpie's "Crazy-Hawk" Stormhawk Walker
A Games Workshop Stormhawk/Stormtalon Walker Conversion
+ With the link to the 3D print files +
 |
| All systems nominal. |
Ok, I like BattleTech. Always have. And of all the mechs in that universe, the Mad Cat (all its variants... really) is without a doubt, my favorite.
It really doesn't come to much of a surprise that, with an abundance of plasticard, a neigh near obsessive love for Mad Cats, and a Stormhawk/tallon kit gathering dust, that I simply had to build a Walker of my own.
Now, at first, I did not consider making the legs myself and I searched online to find "mech" kits in roughly the same scale as the GW models, that would fit the bill as legs for my mech.
Closest I came, was the legs from the Dust Tactics Light Panzer Walkers. And since they came a pair in a box and very cheaply, I figured even if they are not 100%, I wont really loose anything.
Turned, out, they were very much NOT 100%.
They were tiny. A hell of a lot smaller than I expected, but still, had them and wanted to see if I could do anything with them. So I kit-bashed my first Stormtallon walkers from the Dust Tactics and Games Workshop Storm Tallon kits.
 |
| Ultra Marines receiving heavy support from the Snow Crows |
To solve the "too short" legs issue, I extended the legs with heavy flamers from a landraider kit.
 |
Using mainly spoons...
I extended the leg with a Landraider Flamer. |
 |
And Voila! Kinda.
Does make a nice dynamic pose though. |
Worked ok, but I was not happy yet. I wanted a good fit. Additionally, I had the Stormtalon versions already and always did want to put the armour plate on the cockpit in stead of the canopy to see how it would look.
 |
| Actual X-ray of my head. |
So with new oil dripped into my ears, I brained this out... and the Crazy-Hawk, was conceived... no that's not the right word...
...Conceptualized!
Ok, lets get into the build.
The tutorial
1) What you will need for: the template
- The Template (below)
- Cardboard
- Printer (Or a ruler and a lot of time)
- Fine-Point marker
 |
| STC - "Crazy-Hawk" Stormhawk Assault Walker (Large Size!) |
 |
| Design. For reference when gluing the parts on to the leg. |
I recommend printing the template on cardboard, scaling it so that
the
yellow reference block is 25mm (1 inch) when printed out, then cutting
the shapes out
with a pair of scissors and transferring the shapes to your plasticard
with a
fine-point marker.
To make life easier, cut all
the green sections from 0.5mm Plasticard.
The blue sections (minus the toes) are decorative armour plates, and you can cut those from thinker sheets. I used 1mm and it looked pretty good.
Additionally, print and cut a copy on paper first and make a paper-craft vesion just to test
for scaling. There is a lot of cutting in this build, so making a
fitting or printer scaling mistake will be frustrating.
What you will need for: Crazy-Hawk Assault Walker
- 1 x Stormhawk Interceptor kit from Games Workshop
- 1 x Space Marine Air Defence Missile Launcher from ForgeWorld (Optional. Can use several other weapon system options, including even the Stormtalon engines)
- 0.5mm flat Styrene Plasticard Sheet
- 1mm flat Styrene plasticard sheet
- 1mm x 6.3mm Styrene Strip (Optional)
- 3.2mm x 6.3mm Styrene Strip (Optional)
- 4mm Styrene Tube (Optional)
- 8.7mm Styrene Tube (or similar large size. Its decorative, so +/- is fine)
- Putty such as Green Stuff or Milliput (Optional, but I advise using this. So much easier to hide bloopers)
- A VERY sharp hobby knife
- A fine-point marker
- Metal Ruler
- Glue (I'll level with you. Use an extra thin solvent type glue here.
It just makes life so much simpler. I use Tamiya Extra Thin, and
believe me, you will have a hard time convincing me to use anything
else. I almost feel that I should be wearing welding goggles when I use
this stuff with ABS/Styrene.)
- Sharp Cutters
- Files and sanding paper (Fine)
- Patience and a first aid kit
Step 1 - Template
Print the template onto cardboard and cut it out with scissors or a knife.
Step 2 - Transfer and cut
Transfer the shapes to your
plasticard using a fine-point marker, and cut them out using a knife.
This is probably the hardest part of this build and requires the most
attention.
Important! Remember to gut the
green parts from 0.5mm sheet, and the
blue parts from 1mm or larger.
The build, once cut, is fairly simple. So once everything is cut, the hard part is over!
Step 3 - Lowe legs
I used a bar to strength the ankle for the pivot point. I was worried if it will hold up, as thin as it was. Turns out, I had nothing to worry about, but I probably will do this again, just for that bit of assurance. So, I recommend it as well. But, because I did not have a 4mm strip, I glued a 3.2mm strip and 1mm strip back to back, and used that. This is optional and is just to strengthen the leg. Had to file to get it the right size.
 |
| Strips cut and ready to go. |
 |
| Glued front/right and back/left strips |
 |
| Glued front to back. |
 |
| Added details to the top. (Purely aesthetic) |
 |
| "Made" a rod to slip int he bottom to strengthen the pivot point. |
Step 4 - Knee
Measure out where the knee needs to be placed using the design template (you have leeway here, really.) Place the previously made "Leg" on one of the side plate, then glue in place. NOTE: There is a top and bottom side on that knee. If you swap them around, it is ok, just make sure you swap both knees around or it may be noticed.
 |
| Measure the knee out and glue one side in place. |
 |
| Glue the opposing side in place. Make sure you get the exact placement right here. |
 |
| Glue the sides. This part is simple. |
 |
| Done. I filed the pivot point round to enable the foot to move unobstructed. |
Step 5 - "Socks"
Again, quite simple. Lay down one of the sides and simply start gluing the front or back plates in place, working your way to the other end.
 |
| All laid down and ready for gluing. |
 |
| At this point, I recommend drilling the hole for the pivot point. It is
optional however, as you can just glue the foot into its pose and that
will be you. I wanted to see what this thing could do however. |
Next, to guide the Leg, I glued Styrene rods on either inside to form a channel for the leg to ensure is sits center.
 |
| Guides in place. |
I then cut to small pieced of 1mm strips and glued them over the pivot
holes for strength. AGAIN, optional if you do not want to make a toy :D
 |
| Guide-rods in place, and the optional pivot "lugs". |
The pivot lugs are for strength and worked well to get everything in the right pose, but are optional.
The small armour pieces you can see in the image above gave the illusion that the 0.5mm plasticard is much thicker. (0.5mm + 1mm) Again, optional, but its a nice touch.
Now box up and glue the armour side plates in place. Here, I only glued one side in place, and left the other off so that I can insert the pivot bard once the foot was done, then glue it in place, locking the bar in place. The lugs helped a lot here to make sure the bar don't just drop out of the holes.
 |
| The final step. |
 |
| The armour plate holds the pivot bar in place and hides the holes once
it is glued in place. Leave one plate off and glue one plate in place
until you finalise your pose. |
 |
| Left side, armour plate in place |
 |
| Right side, armour still off, and pivot hole exposed. |
Step 6 - Upper leg
Follow the same procedure as the socks to build the upper legs. I added a large diameter Tube (8.7mm) on the inside is just for strength. You can use anything's suitable.
NOTE: The opposing holes were drilled 3.5mm and 4mm. I glued a 4mm tube on the inside and use a 3.5mm rod to connect the parts (next slide). This was more effort than it was worth and I will just use a rod next time. You
REALLY DON'T have to do this. I was just being fancy here.
Recommendation: Drill the pivot holes before you glue.
 |
| Laid out and ready to glue. |
 |
| Glue from one end, and work your way around to the other. |
 |
| The piece of support rod in place. Wont be seen at all. Its just for support. |
 |
| Pop the cap on, and glue the rods in place. IMPORTANT! Opposite sides. |
 |
| Can see the support structure shadow. Say goodbye. You wont see it again. |
 |
| Armour pieces added. You can see it covers the holes on the opposite sides. |
Step 7 - Foot
Follow the same procedure and glue the foot. Again, I recommend drilling the holes before assembly.
 |
| Laid out and ready to glue. |
 |
| Work your way around, but don't glue the last section closed. |
 |
| With the last section still open, glue the roof. You can use the opening to ensure the roof sits level. |
 |
| There are a LOT of odd angles on this piece. I applied 5 metric tonnes
of putty, allowed it to dry and filed it smooth. It came out perfectly. |
 |
| Done here. Next. |
Step 8 - Toes
This is when I realised I gone and f… screwed up. I only took one picture of the toes being made. HOWEVER, its pretty straight forward. The trick is getting the holes drilled right. I found it easier drilling the middle section small, and the 2 behind it larger. The behind holes will be hidden by the mid section toe. This gave the toes a hell of a lot more movement.
 |
| You can see the three front section not fitted yet, and the bottom
plates not glued in yet. I had a nagging feeling I got the size wrong and was
test fitting. I was right. Off by 1mm in length. Nothing a knife did not
fix. |
THIS IS HOWEVER OPTIONAL! You don't have to bother at all if you are just
going to glue the toes into a set pose for a static piece. I made this
one dynamic, again, just to see how it will perform.
Step 9 - Foot bracket
The Foot pivot bracket is straight forward. Four sides + Bottom, then drill a hole. No fuss.
 |
| Bracket in Place. |
Test fit it now on the leg. You may have to file and drill the holes a bit more if you feel it lacks mobility. HOWEVER, I do stress that this part is really optional if you just want to glue it into a set pose. Then just decide on your pose, and glue. No drilling needed.
Step 10 - Assemble the pieces
As a final touch, I cut a thin 8.7mm Tube and glued it to the knee section. I liked how it fleshed out that are.
Step 11 - Hip
To build the Hip, what I did was used the Stormtalon's front gun-mounting, and re-purposed it to the rear. It was surprisingly easy.
 |
| Close the top and bottom openings up. |
 |
| Upside of the Schwartz. |
 |
Assemble the hip-bones.
Yip, filed them round. I know, I am such a chump. |
 |
| Bionics on! Or chicken legs... still not sure. |
 |
| All the angles. I have them. |
 |
| Such a poser. |
Step 12 - Kit modification
Of course, there are a few steps to the kit as well. Tail needs to be cut off for one.
 |
| Its all in the De-Tail. |
Next is to plug the gaping hole the tail leaves. You can do this in any variety of ways. First ones I did, I used the roof piece of a Razorback.Then after that I just used plasticard and decorated. This was actually easier than cutting the roof panel.
 |
| Razor-in-his-back. |
 |
| Plasticard and creativity get it plugged. |
Last bit (already done in the pic above) was the attachment point for the hip, which was simply just the gun mount from the Stormtalon kit and a flat piece of card just to cover the hole where the "flying stem" plugs into the model.
 |
| Hip-Mounting point. |
Step 13 - Build the kit and Accessorize
Rest is up to you. This part at least is fun.
 |
| Missile Pods stuck to the engine halves cut out to fit. |
 |
| Chicken Abuse! |
 |
| Help help! I am being repressed! |
 |
| Oh shut it, Dennis! |
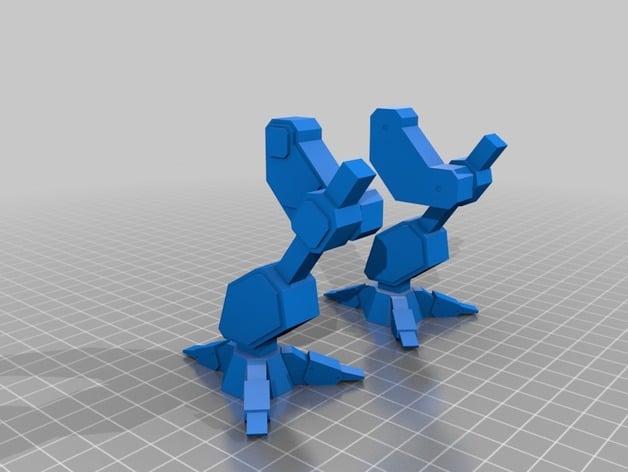
3D Print Files by Daeowar
If you have access to a 3D printer or do not quite feel up to the task of cutting the card, the incredibly talented Daeowar has created 3D printable files and has kindly provided them for free use on his Thinksverse page. They can be found at:
https://www.thingiverse.com/thing:3685667
Reactor on-line. Weapons on-line. Sensors on-line. All systems nominal.
Hope you enjoyed it. And as always, I would LOVE to see you take on the template. Post up picks or links to your Stormhawk/Stormtalon Walker Conversion.
Captain MAGpie,
Styrene Addict


Hey I really liked your design and made a .stl file of it for 3d-printing.
ReplyDeletehttps://www.thingiverse.com/thing:3685667
Just a straight up static pose so far but it would be cool to add ball joints to get some poseability.
Regards /Daeowar
WOW!!! Ok, that is amazing! Dude, that looks really really good! I am well impressed. How far have you get with this project? Printed them yet?
DeleteGood gosh this is awesome, i like the idea a lot and prolly go for the mech legs if i can swing it.
ReplyDeleteDef. Saved the model
Glad you liked it. This one is defiantly the easier one to do if you want to give the Mech-Legs a go.
DeleteAs forgeworld has discontinued the AA missile launcher I found an STL that should work as a replacement
ReplyDeletehttps://www.thingiverse.com/thing:4620216
Yeah, its my thingvere account. I have adapted it to fit the walker. Will publish it when I have all the variant pods done.
Delete